一篇较为详细的 UICollectionView 使用方法总结

花了一周的时间看完了《iOS UICollectionView:The Complete Guide》。英文书读起来还是有点累人的,读完写了些代码做了些笔记和大家分享。书中深入的东西不是太多,时间不充裕的话不太建议大家自己读一遍了。

书名

基本展示

UIScrollView 概述

UICollectionView 继承于 UIScrollView,UICollectionViewDelegate 协议继承于 UIScrollViewDelegate 协议。所以在使用 UICollectionView 的时候,可以直接使用 UIScrollView 的各个属性方法。

UIScrollView 中有几个重要的属性,contentSize 用来标识 UIScrollView 的滚动范围;contentOffset 用来设置视图原点与可视区域左上角的距离;contentInset 可用通过 UIEdgeInsetMake(10,10,10,10) 的方法设置一个内边框,这个值可以是负的,能使视图超出可视的滚动范围。

我们可以通过 setContentOffset:animated: 将视图滚动到某一个位置,也可以使用 scrollRectToVisible:animated: 将某块 rect 滚动到可视区域内(如果已经可见则不会滚动)。

一些有用的 UIScrollViewDelegate 的方法:

  • scrollViewDidScroll::在任何 contentOffset 发生改变的时刻调用。可以用来自定义一个下拉刷新控件。
  • scrollViewWillBeginDragging::在 scrollView 被拖拽的时候调用。可以在此时暂停一些复杂操作以保证滑动的流畅性。
  • scrollViewWillEndDragging:withVelocity:targetContentOffset::在用户结束拖拽并抬起手指后调用。第二个参数表示结束拖动时的速度。第三个参数表示最终结束滚动时的 contentOffset 值,这里是一个 CGPoint 的指针,我们可以让其指向一个新的 CGPoint 以自由控制最终的 contentOffset 大小。除了让我们改变最终停止的位置,这个方法还可以使我们能够对要展示区域的数据提前进行准备。
  • scrollViewShouldScrollToTop::在用户点击状态栏的时候回调,返回 YES 允许 scrollView 滚动到顶端。
  • scrollViewDidScrollToTop::在点击顶部状态栏并且滚动到顶端后回调。
  • scrollViewDidEndDecelerating::在结束减速动画的时候调用。可以用来继续之前暂停的复杂操作。

如何重用 UICollectionViewCell

可以通过 UINib 以及 class 两种方式注册 cell:

  • registerClass:forCellWithReuserIdentifier:
  • registerNib:forCellWithReuseIdentifer:

dequeueReuseableCellWithReuseIdentifirer:forIndexPath: 被调用的时候,你将获得一个被重用的 cell,如果此时没有可用的 cell,系统会帮你创建一个。

展现内容

准备一个 cell 类

自定义一个类继承于 UICollectionViewCell:

1
2
3
4
5
6
7
@interface SimpleCollectionViewCell : UICollectionViewCell

@property (nonatomic,copy) NSString *num;

- (void)refreshData;

@end

UICollectionViewCell 提供了一个重用前清空 cell 内数据的方法 prepareForReuse,重写它,:

1
2
3
4
- (void)prepareForReuse {
[super prepareForReuse];
self.num = @"";
}

一定要调用 super 方法

设置 ViewController

先添加一个 CollectionView,然后注册,先定义一个 static 的 Identifier:

1
2
3
4
5
6
7
8
9
10
11
12
13
14
15
16
17
18
19
20
21
22
static NSString *SIMPLECELLIDENTIFIER = @"Simple Cell Identifier";

- (void)viewDidLoad {
[super viewDidLoad];
// 设置 flowLayout
UICollectionViewFlowLayout *flowLayout = [[UICollectionViewFlowLayout alloc] init];
flowLayout.minimumInteritemSpacing = 40;
flowLayout.minimumLineSpacing = 40;
flowLayout.sectionInset = UIEdgeInsetsMake(10, 10, 10, 10);
flowLayout.itemSize = CGSizeMake(50, 50);


// 添加 collectionView,记得要设置 delegate 和 dataSource 的代理对象
_collectionView = [[UICollectionView alloc] initWithFrame:self.view.frame collectionViewLayout:flowLayout];
_collectionView.delegate = self;
_collectionView.dataSource = self;
_collectionView.backgroundColor = [UIColor redColor];
[self.view addSubview:_collectionView];

// 注册 cell
[_collectionView registerClass:[SimpleCollectionViewCell class] forCellWithReuseIdentifier:SIMPLECELLIDENTIFIER];
}

一定要先将 collectionView 的 delegate 和 dataSource 设置为 self 哦

实现代理

实现两个必须的代理,一个返回 item 的数量,一个返回具体的 cell

1
2
3
4
5
6
7
8
9
10
- (NSInteger)collectionView:(UICollectionView *)collectionView numberOfItemsInSection:(NSInteger)section {
return _count;
}

- (UICollectionViewCell *)collectionView:(UICollectionView *)collectionView cellForItemAtIndexPath:(NSIndexPath *)indexPath {
SimpleCollectionViewCell *cell = (SimpleCollectionViewCell *)[collectionView dequeueReusableCellWithReuseIdentifier:SIMPLECELLIDENTIFIER forIndexPath:indexPath];
cell.num = [NSString stringWithFormat:@"%ld",(long)indexPath.item];
[cell refreshData];
return cell;
}

批量处理

可以将这些操作通过 performBatchUpdates:completion: 方法进行批量处理:

1
2
3
4
5
6
- (void)addItem:(id)sender {
[self.collectionView performBatchUpdates:^{
[self.collectionView deleteItemsAtIndexPaths:@[[NSIndexPath indexPathForItem:2 inSection:0]]];
[self.collectionView insertItemsAtIndexPaths:@[[NSIndexPath indexPathForItem:5 inSection:0]]];
} completion:nil];
}

Cell 的视图层级

在 cell 中添加视图的时候,我们要将视图添加到 contentView 上,而不是 self。我们可以观察 cell 的视图层级:
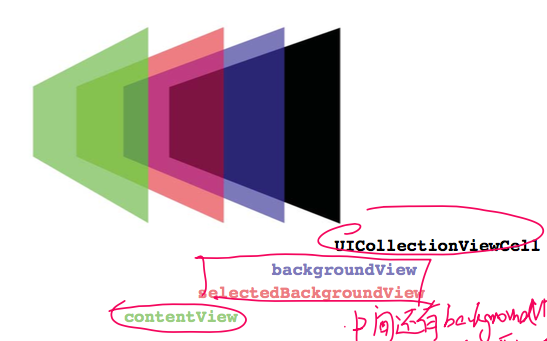
视图层级

contentViewUICollectionViewCell 之间还存在着 selectedBackgroundViewbackgroundView。一般情况下,这两个 view 都是 nil 的。如果你希望他们能显示出来,那么需要 alloc 出来,不需要手动设置 frame 大小,系统会自己撑满整个 cell:

1
self.backgroundView = [UIView alloc] init];

更进一步

上面一节讲了如何展示一个最基本的 CollectionView,本节要在展示的基础上拓展一些操作方法。

Supplementary Views

Supplementary View 是 UICollectionViewLayout 提供的,可以随着 CollectionView 滚动,并且是数据驱动,可以展示信息的。

UICollectionViewFlowLayout 中提供了两种 Supplementary View:头部视图和尾部视图。但是这只是在这种 Layout 方式下的特殊类型,之后我们会学习如何自定义 Supplementary View。只要记住,任何有数据展示的并且不是 cell 的视图,都可以用 Supplementary View 展示

Supplementary View 和 cell 类似,也需要注册 Nib 或者 Class,也会被一直重用。

定义一个 Supplementary View 类

自定义的 Supplementary View 继承于 UICollectionReusableView。这个类提供了一些和 UICollectionViewCell 相同的方法(其实 UICollectionViewCell 就是继承于 UICollectionReusableView 的),但是比其更轻量级,比如无法像 Cell 一样,处理点击以及高亮等(如果你想要,你需要自己实现)。

1
2
3
4
5
6
7
@interface SimpleReusableView : UICollectionReusableView

@property (nonatomic,strong) NSString *num;

- (void)refreshData;

@end

同样实现以下 prepareForReuse 方法:

1
2
3
4
- (void)prepareForReuse {
[super prepareForReuse];
self.num = @"";
}

设置 ViewController

还是在 viewDidLoad 方法中注册,同样先定义一个 Identifier:

1
2
3
4
5
6
7
8
9
10
11
12
13
static NSString *SIMPLESUPPLEMENTARYIDENTIFIER = @"Simple Supplementary Identifier";
static NSString *SIMPLECELLIDENTIFIER = @"Simple Cell Identifier";

- (void)viewDidLoad {
[super viewDidLoad];
...

// 设置大小
flowLayout.headerReferenceSize = CGSizeMake(self.view.bounds.size.width, 30);

// 注册 Supplementary View
[_collectionView registerClass:[SimpleReusableView class] forSupplementaryViewOfKind:UICollectionElementKindSectionHeader withReuseIdentifier:SIMPLESUPPLEMENTARYIDENTIFIER];
}

这里注册的是 header:UICollectionElementKindSectionHeader,类似的还可以注册 footer:UICollectionElementKindSectionFooter

另外,一定要设置 UICollectionViewFlowLayoutheaderReferenceSize 属性,其默认是 CGSizeZero 的,如果不手动设置,Supplementary View 就无法显示。但是切记,如果你设置了这个值,就一定要实现 collectionView:viewForSupplementaryElementOfKind:atIndexPath: 返回一个 SupplementaryView,否则就会产生异常。

实现代理:

同样实现两个代理,一个返回 section 的数量,一个返回 Supplementary View

1
2
3
4
5
6
7
8
9
10
- (NSInteger)numberOfSectionsInCollectionView:(UICollectionView *)collectionView {
return _sectionCount;
}

- (UICollectionReusableView *)collectionView:(UICollectionView *)collectionView viewForSupplementaryElementOfKind:(NSString *)kind atIndexPath:(NSIndexPath *)indexPath {
SimpleReusableView *reuseableView = (SimpleReusableView *)[collectionView dequeueReusableSupplementaryViewOfKind:kind withReuseIdentifier:SIMPLESUPPLEMENTARYIDENTIFIER forIndexPath:indexPath];
reuseableView.num = [NSString stringWithFormat:@"%ld",(long)indexPath.section];
[reuseableView refreshData];
return reuseableView;
}

响应交互

实现 CollectionViewDelegate 的方法 collectionView:didSelectedAtIndexPath:

1
2
3
4
5
6
7
- (void)collectionView:(UICollectionView *)collectionView didSelectItemAtIndexPath:(NSIndexPath *)indexPath {
// 取消选中
[collectionView deselectItemAtIndexPath:indexPath animated:YES];
// 获取当前点击的 cell
SimpleCollectionViewCell *cell = (SimpleCollectionViewCell *)[collectionView cellForItemAtIndexPath:indexPath];
...
}

deselectItemAtIndexPath:animted: 方法取消选中。

cellForItemAtIndexPath: 方法通过 indexPath 获取当前 cell。

对 item 和 section 的操作

系统提供了以下方法来对 item 和 section 进行插入、删除、重载、移动操作:

  • insertSections:
  • deleteSections:
  • reloadSections:
  • moveSection:toSection:
  • insertItemsAtIndexPaths:
  • deleteItemsAtIndexPaths:
  • reloadItemsAtIndexPaths:
  • moveItemAtIndexPath:toIndexPath:

注意一定要先改变 item 或者 section 的数量,然后才能对 item 或者 section 进行插入和删除。

这些方法可以放在 performBatchUpdates:completion: 中进行批量处理。

改变 item 和 section 的大小

前面,我们通过 UICollectionViewFlowLayoutitemSizeheaderReferenceSize (包括 footerReferenceSize) 统一设置了 item 和 section 的大小。

如何每个 item 和 section 的大小不规则呢? 我们可以实现 UICollectionViewDelegateFlowLayout 协议中的以下方法实现:

  • collectionView:layout:sizeForItemAtIndexPath:
  • collectionView:layout:referenceSizeForHeaderInSection:
  • collectionView:layout:referenceSizeForFooterInSection:

实现这些方法,并在根据 indexPath 返回响应的 CGSize.

UICollectionViewDelegateFlowLayout协议继承于 UICollectionViewDelegate协议,所以仍然将 CollectionView 的 delegate 设置为 ViewController 就行了。

是否可以选中

实现 UICollectionViewDelegate 协议中的以下方法可以实现控制 item 是否可以高亮,选中,取消选中:

  • collectionView:shouldHighlightItemAtIndexPath:
  • collectionView:shouldSelectItemAtIndexPath:
  • collectionView:shouldDeselectedItemAtIndexPath:

复制粘贴操作

有时候我们想复制一些 cell 中的东西,实现下面方法就可以复制:

1
2
3
4
5
6
7
8
9
10
11
12
13
14
15
16
17
18
19
20
21
22
// 能否选中
- (BOOL)collectionView:(UICollectionView *)collectionView shouldSelectItemAtIndexPath:(NSIndexPath *)indexPath {
return YES;
}

// 选中后能否弹出菜单
- (BOOL)collectionView:(UICollectionView *)collectionView shouldShowMenuForItemAtIndexPath:(NSIndexPath *)indexPath {
return YES;
}

// 能否执行菜单里的某个操作
- (BOOL)collectionView:(UICollectionView *)collectionView canPerformAction:(SEL)action forItemAtIndexPath:(NSIndexPath *)indexPath withSender:(id)sender {
return YES;
}

// 棘突执行菜单选项的操作
- (void)collectionView:(UICollectionView *)collectionView performAction:(SEL)action forItemAtIndexPath:(NSIndexPath *)indexPath withSender:(id)sender {
if ([NSStringFromSelector(action) isEqualToString:@"copy:"]) {
UIPasteboard *pasteboard = [UIPasteboard generalPasteboard];
[pasteboard setString:((SimpleCollectionViewCell *)[collectionView cellForItemAtIndexPath:indexPath]).num];
}
}

使用 UICollectionViewFlowLayout

创建 UICollectionViewFlowLayout 的子类

系统的 UICollectionViewFlowLayout 虽然允许你定义 item 以及 Supplementary Views 的大小,但是你不能自定义每个 View 的位置。比如下图,你想让所有 item 都沿着虚线排布,只用 UICollectionViewFlowLayout 是不够的。我们需要继承它,并且重写其中的部分方法,实现自定义的布局。

实际布局

继承 UICollectionViewFlowLayout

创建一个类,继承于 UICollectionViewFlowlayout,重写它 init 方法。我们可以把之前写在 ViewController 中的对于 layout 的设置移到 init 方法中,作为默认实现,减少 VC 中的代码量:

1
2
3
4
5
6
7
8
9
10
11
12
- (instancetype)init {
if (!(self = [super init])) {
return nil;
}
self.minimumInteritemSpacing = 20;
self.minimumLineSpacing = 40;
self.sectionInset = UIEdgeInsetsMake(10, 10, 10, 10);
self.itemSize = CGSizeMake(50, 50);
self.headerReferenceSize = CGSizeMake([UIScreen mainScreen].bounds.size.width, 30);

return self;
}

重写布局方法 layoutAttributesForElementsInRect:

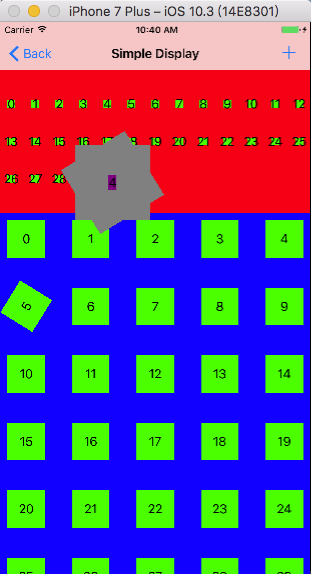
我们需要重写 layoutAttributesForElementsInRect: 方法,该方法返回一个包含所有布局信息 UICollectionViewLayoutAttributes的数组。比如我们可以把 CollectionView 中所有 cell 都旋转 45°:

1
2
3
4
5
6
7
8
9
10
11
12
- (NSArray<UICollectionViewLayoutAttributes *> *)layoutAttributesForElementsInRect:(CGRect)rect {
NSArray *array = [super layoutAttributesForElementsInRect:rect];
NSMutableArray *newArray = [NSMutableArray array];
for (UICollectionViewLayoutAttributes *attrs in newArray) {
UICollectionViewLayoutAttributes *newAttrs = [attrs copy];
if (attrs.representedElementKind == nil) {
newAttrs.transform = CGAffineTransformMakeRotation(45);
}
[newArray addObject:newAttrs];
}
return newArray;
}

我们通过父类方法 [super layoutAttributesForElementsInRect:rect] 先创建了一个正常情况下的所有属性的数组。这个父类方法默认情况下,只会创建在 rect 范围内的视图的布局属性。所以如果你想把原来不会被现实的视图也显示出来的话,你就不得不自己把所有布局属性都创建出来,放入数组中。

最好不要直接修改这个数组里的元素,而是创建一个新的拷贝。否则当你想增删修改 cell 的时候会出现下面的问题,极有可能引起应用崩溃:

拷贝数组

修改的时候我们还要判断 attrs.representedElementKind == nil。这是由于这个属性数组包含了所有视图的布局信息,包括 cell,supplementary view,decortation view。当 representedElementKindnil 的时候,表示这个布局信息是 Item 的布局信息。

重写其他布局方法

除了layoutAttributesForElementsInRect: 方法,还提供了如下方法用来分别订制 Item,SupplementaryView,DecorationView:

  • layoutAttributesForItemAtIndexPath:
  • layoutAttributesForSupplementaryViewOfKind:atIndexPath:
  • layoutAttributesForDecorationViewOfKind:atIndexPath:

这些方法用来订制某个特殊的视图的布局。系统一般不会主动调用你你重写的这几个方法(不是绝对不会调用啊,比如下面的移动 Item 的时候,就是系统调用这个方法获取被点击的 Item 的布局属性。所以最好还是实现这几个方法,然后手动在 layoutAttributesForElementsInRect: 中调用),需要你自己在 layoutAttributesForElementsInRect: 中手动调用。比如将第二栏的第五个 Item 及第二栏的 SupplementaryView 旋转 45°:

1
2
3
4
5
6
7
8
9
10
11
12
13
14
15
16
17
18
19
20
21
22
23
24
25
26
27
28
29
30
31
32
33
34
- (NSArray<UICollectionViewLayoutAttributes *> *)layoutAttributesForElementsInRect:(CGRect)rect {
NSArray *array = [super layoutAttributesForElementsInRect:rect];
NSMutableArray *newArray = [NSMutableArray array];
for (UICollectionViewLayoutAttributes *attrs in array) {
UICollectionViewLayoutAttributes *newAttrs = [attrs copy];
// 设置每一个 item
if (attrs.representedElementKind == nil) {
if (attrs.indexPath.item == 5 && attrs.indexPath.section == 1) {
newAttrs = [self layoutAttributesForItemAtIndexPath:[NSIndexPath indexPathForItem:5 inSection:1]];
}
}
// 设置每一个 SupplementaryView
if (attrs.representedElementCategory == UICollectionElementCategorySupplementaryView) {
if (attrs.indexPath.section == 1) {
newAttrs = [self layoutAttributesForSupplementaryViewOfKind:UICollectionElementKindSectionHeader atIndexPath:[NSIndexPath indexPathForItem:0 inSection:1]];
}
}
[newArray addObject:newAttrs];
}

return newArray;
}

- (UICollectionViewLayoutAttributes *)layoutAttributesForItemAtIndexPath:(NSIndexPath *)indexPath {
UICollectionViewLayoutAttributes *itemAttributes = [super layoutAttributesForItemAtIndexPath:indexPath];
itemAttributes.transform = CGAffineTransformMakeRotation(-45);
return itemAttributes;
}

- (UICollectionViewLayoutAttributes *)layoutAttributesForSupplementaryViewOfKind:(NSString *)elementKind atIndexPath:(NSIndexPath *)indexPath {
UICollectionViewLayoutAttributes *supplementaryAttributes = [super layoutAttributesForSupplementaryViewOfKind:elementKind atIndexPath:indexPath];
itemAttributes.transform = CGAffineTransformMakeRotation(45);
return supplementaryAttributes;
}

其中判断 representElementCategory 是否为 UICollectionElementCategorySupplementaryView 来区分是否是 SupplementaryView。

使用 DecorationView

DecorationView 不展示任何信息,所以不需要再 ViewController 中添加任何代码,所有的代码都在 UICollectionViewFlowLayout 的子类中。DecorationView 也是继承于 UICollectionReusableView

创建一个 DecorationView 实例

DecorationView 除了继承于 UICollectionReusableView 之外和普通 View 的创建毫无差异。重写它的 init 方法:

1
2
3
4
5
6
7
8
9
10
11
12
13
- (instancetype)initWithFrame:(CGRect)frame {
if (!(self = [super initWithFrame:frame])) {
return nil;
}
_decorationView = [[UIView alloc] initWithFrame:frame];
_decorationView.backgroundColor = [UIColor blueColor];
[self addSubview:_decorationView];
return self;
}

- (void)layoutSubviews {
_decorationView.frame = self.bounds;
}
重写 layoutAttributesForDecorationViewOfKind:atIndexPath:

如果你愿意,你想设置多少个 DecorationView 就可以设置多少个。下面将实现为某个 section 添加一个 DecorationView 的背景:

1
2
3
4
5
6
7
8
9
10
11
12
13
14
- (UICollectionViewLayoutAttributes *)layoutAttributesForDecorationViewOfKind:(NSString *)elementKind atIndexPath:(NSIndexPath *)indexPath {
UICollectionViewLayoutAttributes *decorationAttributes = [UICollectionViewLayoutAttributes layoutAttributesForDecorationViewOfKind:elementKind withIndexPath:indexPath];
UICollectionViewLayoutAttributes *newDecorationAttributes = [decorationAttributes copy];
if ([elementKind isEqualToString:SIMPLEDECORATIONKIND]) {
NSIndexPath *indexPathFirst = [NSIndexPath indexPathForItem:0 inSection:1];
NSIndexPath *indexPathLast = [NSIndexPath indexPathForItem:[self.collectionView numberOfItemsInSection:1] inSection:1];
UICollectionViewLayoutAttributes *attrsFirst = [self layoutAttributesForItemAtIndexPath:indexPathFirst];
UICollectionViewLayoutAttributes *attrsLast = [self layoutAttributesForItemAtIndexPath:indexPathLast];
newDecorationAttributes.frame = CGRectMake(attrsFirst.frame.origin.x, attrsFirst.frame.origin.y, self.collectionView.frame.size.width, attrsLast.frame.origin.y-attrsFirst.frame.origin.y);
// 想要作为背景图像,就一定要将其 zIndex 设置为 -1
newDecorationAttributes.zIndex = -1;
}
return newDecorationAttributes;
}

这个方法中,通过 section1 中最后一个 item 与第一个 item,计算得出了 section 的大小以及位置。将设置为 UICollectionViewLayoutAttributesframe 属性。

由于是背景所以一定要将其 zIndex 设置为一个负值,使其永远在图层的下部。

这里判断的 SIMPLEDECORATIONKIND 是一个自己设定的字符串,用来标识是哪个 DecorationView。

可以通过 [UICollectionViewLayoutAttributes layoutAttributesForDecorationViewOfKind:elementKind withIndexPath:indexPath] 这个类方法获取了一个默认的布局属性的值(之前我们都是用 super 获取的),Item 和 SupplementaryView 也有类似的方法:

  • [UICollectionViewLayoutAttributes layoutAttributesForCellWithIndexPath:indexPath]
  • [UICollectionViewLayoutAttributes layoutAttributesForSupplementaryViewOfKind:elementKind withIndexPath:indexPath]
  • [UICollectionViewLayoutAttributes layoutAttributesForDecorationViewOfKind:elementKind withIndexPath:indexPath]
添加布局属性

layoutAttributesForElementsInRect: 中调用上面的方法,将其属性添加到布局属性数组中。

1
2
3
4
5
6
7
8
9
10
11
- (NSArray<UICollectionViewLayoutAttributes *> *)layoutAttributesForElementsInRect:(CGRect)rect {
NSArray *array = [super layoutAttributesForElementsInRect:rect];
NSMutableArray *newArray = [NSMutableArray array];
// 设置 Item 和 SupplementaryView
...
// 设置 DecorationView
UICollectionViewLayoutAttributes *newAttrs = [self layoutAttributesForDecorationViewOfKind:SIMPLEDECORATIONKIND atIndexPath:[NSIndexPath indexPathForItem:0 inSection:1]];
[newArray addObject:newAttrs];

return newArray;
}
初始方法中注册自己

由于 DecorationView 是和数据无关的,不需要在 ViewController 中添加任何代码。我们在 UICollectionViewFlowLayout 中注册自己:

1
2
3
4
5
6
7
8
9
10
11
12
//  SimpleCollectionViewFlowLayout.m

static NSString *SIMPLEDECORATIONKIND = @"Simple Decoration Kind";
- (instancetype)init {
if (!(self = [super init])) {
return nil;
}
// layout 的其他初始化设置
...
[self registerClass:[SimpleDecorationView class] forDecorationViewOfKind:SIMPLEDECORATIONKIND];
return self;
}

为什么要注册呢?因为布局属性中只知道 kind 这个标识的字符串是不行的,要将 kind 和 class 关联起来。所以需要 registerClass:forDecorationViewOfKind: 这一个步骤。Item 和 SupplementaryView 的注册也是类似的道理(这两个的注册是为了 class 和重用数组关联起来)。

最终的显示效果:

最终效果

UICollectionViewLayoutAttributes 的属性

布局属性 UICollectionViewLayoutAttributes 包含了许多属性:

  • Frame
  • Center
  • Size
  • 3D Transform
  • Alpha
  • Z-Index
  • Hidden
  • Element category (cell,supplementary view,or decoration view)
  • Element kind (nil for cells)

最后两个属性用来判断视图的类型,这个在之前也用到过了。representedElementCategory 是一个枚举,包含了表示 cell,SupplementaryView,DecorationView 的几个枚举值。representedElementKind 其实就是注册 SupplementaryView 和 DecorationView 时候传入的 kind,由于 Item 注册的时候不需要传入 kind,所以 Item 布局的这个属性就是 nil。

继承 UICollectionViewLayout

一般情况下,能用 UICollectionViewFlowLayout 的,我们就不需要自己继承 UICollectionViewLayout

新建一个类继承于 UICollectionViewLayout,该类提供了一个方法 prepareLayout 用来做布局前的准备,在每次布局的时候都会调用。我们可以把之前在 init 中的设置放到这个方法中:

1
2
3
4
5
6
7
- (void)prepareLayout {
[super prepareLayout];
CGSize size = self.collectionView.bounds.size;
_cellCount = [self.collectionView numberOfItemsInSection:0];
_center = CGPointMake(size.width/2, size.height/2);
_radius = size.width/2.5;
}

同样的我们需要实现 layoutAttributesForElementsInRect: 来获取布局属性:

1
2
3
4
5
6
7
8
9
10
11
12
13
14
15
16
- (NSArray<UICollectionViewLayoutAttributes *> *)layoutAttributesForElementsInRect:(CGRect)rect {
NSMutableArray *attrs = [NSMutableArray array];
for (int i = 0; i < self.cellCount; i++) {
NSIndexPath *indexPath = [NSIndexPath indexPathForItem:i inSection:0];
[attrs addObject:[self layoutAttributesForItemAtIndexPath:indexPath]];
}
return attrs;
}

- (UICollectionViewLayoutAttributes *)layoutAttributesForItemAtIndexPath:(NSIndexPath *)indexPath {
UICollectionViewLayoutAttributes *attrs = [UICollectionViewLayoutAttributes layoutAttributesForCellWithIndexPath:indexPath];
attrs.size = CGSizeMake(70, 70);
attrs.center = CGPointMake(self.center.x +self.radius * cosf(2 * indexPath.item * M_PI / self.cellCount -M_PI_2), self.center.y +self.radius * sinf(2 * indexPath.item * M_PI /self.cellCount - M_PI_2));
attrs.transform3D = CATransform3DMakeRotation(2 * M_PI *indexPath.item / self.cellCount, 0, 0, 1);
return attrs;
}

UICollectionViewFlowLayout 不同的是,这里的所有布局属性都需要我们自己实现,没有父类方法可以调用了。另外,由于 collectionView:sizeForItemAtIndexPath: 这个获取 Item 大小的方法也是 FlowLayout 提供的,所以我们需要自己设置布局属性的 size

###

一个例子

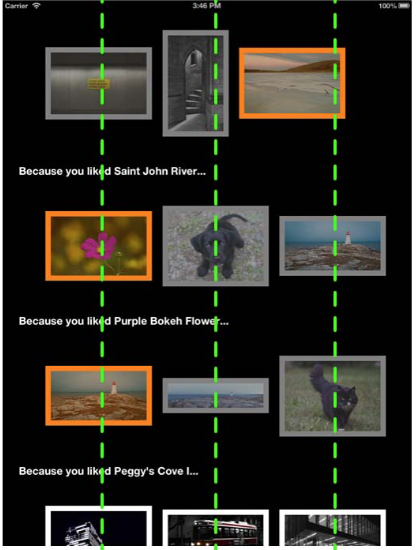
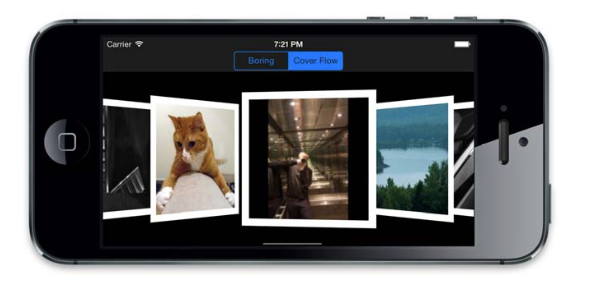
如何将布局切换到下面这个图片的效果呢?下面将分析几个基本点,具体详见 Demo。

例子

切换布局

一个 CollectionView 可以通过其自身的 setCollectionViewLayout:animated: 方法随时切换布局。在切换布局后,需要通过 invalidateLayout 方法刷新新设置的布局。

一列展示一个

一列展示一个,你可以重写 Item 的布局方法手动计算每一个 Item 的 frame,但是这是没有必要的。UICollectionViewFlowLayout 默认在当前列不能排下下一个 Item 的时候自动换列,所以我们只要将 minimumInteritemSpacing 设置的很大就可以了。

设置布局属性

我们要对在屏幕上显示的视图,根据其所在的位置设置布局属性。我们可以通过自定义的 FlowLayout 类拿到 CollectionView 实例的 contentOffsetself.collectionView.contentOffset.x),然后和布局属性的 frame 进行比较。

1
2
3
4
5
6
7
8
9
10
11
12
13
14
15
16
- (NSArray<UICollectionViewLayoutAttributes *> *)layoutAttributesForElementsInRect:(CGRect)rect {
NSArray *array = [super layoutAttributesForElementsInRect:rect];
NSMutableArray *newArray = [NSMutableArray array];
float centerX = self.collectionView.contentOffset.x + self.collectionView.bounds.size.width/2;

for (UICollectionViewLayoutAttributes *attrs in array) {
UICollectionViewLayoutAttributes *newAttrs = [attrs copy];
if (newAttrs.representedElementCategory == UICollectionElementCategorySupplementaryView) {
continue;
}
float offset = 1.5 - fabs(centerX - attrs.center.x)/self.collectionView.frame.size.width;
newAttrs.transform = CGAffineTransformScale(newAttrs.transform, offset, offset);
[newArray addObject:newAttrs];
}
return newArray;
}

动态计算布局属性

获取布局属性只会在加载的时候进行一次,而这个例子需要时时根据 offset 更新。这就需要重写 FlowLayout 的 shouldInvalidateLayoutForBoundsChange: 方法,并返回 YES,保证用户滑动的时候,布局属性的方法总是会重新计算的:

1
2
3
- (BOOL)shouldInvalidateLayoutForBoundsChange:(CGRect)newBounds {
return YES;
}

滑动到特定位置

这个例子中需要在停止滑动的时候,图片总是在最中间的,那就需要改变最终的 offset。可以重写 targetContentOffsetForProposedContentOffset:withScrollingVelocity:,该方法输入理想情况下的 contentOffset,返回一个自己设定的 contentOffset。因此,你可以找到离屏幕中心最近的布局属性,然后计算其与中心的差值作为补偿值:

1
2
3
4
5
6
7
8
9
10
11
12
13
14
- (CGPoint)targetContentOffsetForProposedContentOffset:(CGPoint)proposedContentOffset withScrollingVelocity:(CGPoint)velocity {
CGRect proposedRect = CGRectMake(proposedContentOffset.x, 0, self.collectionView.bounds.size.width, self.collectionView.bounds.size.height);
NSArray *array = [self layoutAttributesForElementsInRect:proposedRect];
float offset = 1000;
for (UICollectionViewLayoutAttributes *attrs in array) {
if (attrs.representedElementCategory == UICollectionElementCategorySupplementaryView) {
continue;
}
if (fabs(attrs.center.x - (proposedContentOffset.x+self.collectionView.bounds.size.width/2))<fabs(offset)) {
offset = attrs.center.x - (proposedContentOffset.x+self.collectionView.bounds.size.width/2);
}
}
return CGPointMake(proposedContentOffset.x + offset, proposedContentOffset.y);
}

总结

整个 CollectionView 可以划分为两个部分,视图部分和布局部分。这两者如何联系在一起的,或者说给定一块区域到底是如何知道应该显示哪个视图的呢?通过 indexPath 以及 representedElementKind。这两个都是 UICollectionViewLayoutAttributes 中的属性。

在视图加载的时候,会在 layoutAttributesForElementsInRect 返回的数组中找到会在屏幕上显示的布局,然后根据这个布局的 indexPath 以及 representedElementKind 通过 collectionView:viewForSupplementaryElementOfKind:atIndexPath,collectionView:cellForItemAtIndexPath 这两个代理方法,获取相对应的视图展示出来。

那么为什么有了 indexPath 了还要 representedElementKind 呢?对于 Item 来说,indexPath 可以通过 itemsection 唯一地确定视图。但是对于 SupplementaryView 的 DecorationView,这两个视图通常只用到了 section 而不用 item(其实你想用 item 来标识也是可以的,representedElementKind 其实就相当于是个 item 的作用。比如一个 SupplementaryView 的头尾视图,你可以规定 item 为0代表头视图,item 为1代表尾视图,但是这样肯定没有用 UICollectionElementKindSectionHeader,UICollectionElementKindSectionFooter 来的直观),所以就要用一个 representedElementKind 来标识在同一个 section 内,这个位置到底是应该显示哪个视图。

一些应用

移动 Item

首先,在 ViewController 中为 CollectionView 添加长按手势:

1
2
3
4
5
- (void)viewDidLoad {
...
UILongPressGestureRecognizer *longGesture = [[UILongPressGestureRecognizer alloc] initWithTarget:self action:@selector(handlelongGesture:)];
[self.collectionView addGestureRecognizer:longGesture];
}

实现手势操作,算是比较固定的套路:

1
2
3
4
5
6
7
8
9
10
11
12
13
14
15
16
17
18
19
20
21
22
23
24
25
26
27
//再实现手势操作
- (void)handlelongGesture:(UILongPressGestureRecognizer *)longGesture {
//判断手势状态
switch (longGesture.state) {
case UIGestureRecognizerStateBegan:{
//判断手势落点位置是否在路径上
NSIndexPath *indexPath = [self.collectionView indexPathForItemAtPoint:[longGesture locationInView:self.collectionView]];
if (indexPath == nil) {
break;
}
//在路径上则开始移动该路径上的cell
[self.collectionView beginInteractiveMovementForItemAtIndexPath:indexPath];
}
break;
case UIGestureRecognizerStateChanged:
//移动过程当中随时更新cell位置
[self.collectionView updateInteractiveMovementTargetPosition:[longGesture locationInView:self.collectionView]];
break;
case UIGestureRecognizerStateEnded:
//移动结束后关闭cell移动
[self.collectionView endInteractiveMovement];
break;
default:
[self.collectionView cancelInteractiveMovement];
break;
}
}

其中 CollectionView 提供了 indexPathForItemAtPoint: 方法通过坐标找到对应的 Item。

在 CollectionView 中允许 Item 移动:

1
2
3
4
5
6
7
8
//返回YES允许其item移动
- (BOOL)collectionView:(UICollectionView *)collectionView canMoveItemAtIndexPath:(NSIndexPath *)indexPath{
return YES;
}

//移动item时回调
- (void)collectionView:(UICollectionView *)collectionView moveItemAtIndexPath:(NSIndexPath *)sourceIndexPath toIndexPath:(NSIndexPath*)destinationIndexPath {
}

点击 Item 高亮操作

实现方式是在高亮的回调方法中获取当前点击的 Item,然后对其布局属性进行修改:

1
2
3
4
5
6
7
8
9
10
11
12
13
14
15
16
17
18
19
// 允许选中时,高亮
-(BOOL)collectionView:(UICollectionView *)collectionView shouldHighlightItemAtIndexPath:(NSIndexPath *)indexPath{
return YES;
}
// 高亮完成后回调
// 放大缩小效果
-(void)collectionView:(UICollectionView *)collectionView didHighlightItemAtIndexPath:(NSIndexPath *)indexPath{
UICollectionViewCell *selectedCell = [collectionView cellForItemAtIndexPath:indexPath];
[UIView animateWithDuration:1 animations:^{
selectedCell.transform = CGAffineTransformMakeScale(2.0f, 2.0f);
}];
}
// 由高亮转成非高亮完成时的回调
-(void)collectionView:(UICollectionView *)collectionView didUnhighlightItemAtIndexPath:(NSIndexPath *)indexPath{
UICollectionViewCell *selectedCell = [collectionView cellForItemAtIndexPath:indexPath];
[UIView animateWithDuration:1 animations:^{
selectedCell.transform = CGAffineTransformMakeScale(1.0f, 1.0f);
}];
}

无限轮播

无限轮播的主要方法就是将 CollectionView 的 Item 设置的足够多以至于让用户不能一下子滚动到底部。并且,在滑动到临界区的时候修改器 contentOffset.

初始化

比如要实现一个图片的轮播,collectionview 传入了一组 url:

1
2
3
4
5
6
7
8
9
10
11
12
13
14
15
16
17
18
19
20
21
22
23
24
25
26
- (instancetype)initWithURLs:(NSArray <NSURL *> *)urls {
// UICollectionViewFlowLayout
self = [super initWithFrame:CGRectZero collectionViewLayout:[[LoopViewLayout alloc] init]];
if (self) {
_urls = urls;

self.dataSource = self;
self.delegate = self;

// 自定义了一个 LoopViewCell 具体布局按照实际情况设置
[self registerClass:[LoopViewCell class] forCellWithReuseIdentifier:loopViewCellId];

// 初始显示第二组 [0,1,2] [3(_urls.count),4,5]
// 主队列:
// 1. 安排任务在主线程上执行
// 2. 如果主线程当前有任务,主队列暂时不调度任务!所以等cell的数据源和代理方法执行完毕后才执行这个block里面的滚动任务.
dispatch_async(dispatch_get_main_queue(), ^{

NSIndexPath *indexPath = [NSIndexPath indexPathForItem:_urls.count inSection:0];

// 滚动位置!
[self scrollToItemAtIndexPath:indexPath atScrollPosition:UICollectionViewScrollPositionLeft animated:NO];
});
}
return self;
}

初始化的时候先将 collectionview 滚动到第二组的第一个cell。

设置cell个数

1
2
3
4
- (NSInteger)collectionView:(UICollectionView *)collectionView numberOfItemsInSection:(NSInteger)section {
//这里为了防止滚动到最后一页来回跳动导致的卡顿,多写点组数让一直到不了最后一组,因为cell重用,所以不影响内存.
return _urls.count * 100;
}

防止滚动太多引起卡顿,所以将数量设置的很大

边界设置

1
2
3
4
5
6
7
8
9
10
11
12
13
14
15
16
17
18
#pragma mark - UICollectionViewDelegate
- (void)scrollViewDidEndDecelerating:(UIScrollView *)scrollView {
// 1. 获取当前停止的页面
NSInteger offset = scrollView.contentOffset.x / scrollView.bounds.size.width;
// 2. 第0页,调转到,第1组的第0页
// 最后一页,跳转到第0组的最后一页
if (offset == 0 || offset == ([self numberOfItemsInSection:0] - 1)) {
// NSLog(@"%zd", offset);
// 第 0 页
if (offset == 0) {
offset = _urls.count;
} else {
offset = _urls.count - 1;
}
// 重新调整 contentOffset
scrollView.contentOffset = CGPointMake(offset * scrollView.bounds.size.width, 0);
}
}

自行按照情况设置 contentOffse

流式布局

其实就是在 prepareLayout 方法中,自定义了每一个 Item 的布局属性。

1
2
3
4
5
6
7
8
9
10
11
12
13
14
15
16
17
18
19
20
21
22
23
24
25
26
27
28
29
30
31
32
33
34
35
36
37
38
39
40
41
42
43
44
45
46
47
48
49
50
51
52
53
54
55
56
57
58
59
60
61
62
63
64
@interface MyLayout : UICollectionViewFlowLayout
@property(nonatomic,assign)int itemCount;
@end

@interface MyLayout()
@property (nonatomic,assign) CGFloat maxHeight;
@end
@implementation MyLayout
{
//这个数组就是我们自定义的布局配置数组
NSMutableArray * _attributeAttay;
}
//数组的相关设置在这个方法中
//布局前的准备会调用这个方法
-(void)prepareLayout{
_attributeAttay = [[NSMutableArray alloc]init];
[super prepareLayout];
//演示方便 我们设置为静态的2列
//计算每一个item的宽度
float WIDTH = ([UIScreen mainScreen].bounds.size.width-self.sectionInset.left-self.sectionInset.right-self.minimumInteritemSpacing)/2;
//定义数组保存每一列的高度
//这个数组的主要作用是保存每一列的总高度,这样在布局时,我们可以始终将下一个Item放在最短的列下面
CGFloat colHight[2]={self.sectionInset.top,self.sectionInset.bottom};
//itemCount是外界传进来的item的个数 遍历来设置每一个item的布局
for (int i=0; i<_itemCount; i++) {
//设置每个item的位置等相关属性
NSIndexPath *index = [NSIndexPath indexPathForItem:i inSection:0];
//创建一个布局属性类,通过indexPath来创建
UICollectionViewLayoutAttributes * attris = [UICollectionViewLayoutAttributes layoutAttributesForCellWithIndexPath:index];
//随机一个高度 在40——190之间
CGFloat hight = arc4random()%150+40;
//哪一列高度小 则放到那一列下面
//标记最短的列
int width=0;
if (colHight[0]<colHight[1]) {
//将新的item高度加入到短的一列
colHight[0] = colHight[0]+hight+self.minimumLineSpacing;
width=0;
}else{
colHight[1] = colHight[1]+hight+self.minimumLineSpacing;
width=1;
}

//设置item的位置
attris.frame = CGRectMake(self.sectionInset.left+(self.minimumInteritemSpacing+WIDTH)*width, colHight[width]-hight-self.minimumLineSpacing, WIDTH, hight);
[_attributeAttay addObject:attris];

}
if (colHight[0]>colHight[1]) {
_maxHeight = colHight[0];
}else{
_maxHeight = colHight[1];
}

}

-(CGSize)collectionViewContentSize{
return CGSizeMake(100, _maxHeight);
}
//这个方法中返回我们的布局数组
-(NSArray<UICollectionViewLayoutAttributes *> *)layoutAttributesForElementsInRect:(CGRect)rect{
return _attributeAttay;
}
@end

本文Demo