有些时候需求上的动画效果不能仅通过贴图来解决,这就需要我们自定义各种图案,然后动态的绘制完成动态效果。比较复杂,但是实现出来的东西非常精致。
drawRect 获取当前图形上下文绘图
绘制矩形
1 | - (void)drawRect:(CGRect)rect |
圆和椭圆
替换上面的代码为:
1 | // 圆 |
都是需要一个外接矩形,椭圆和圆不同之处在于圆的外接矩形是个正方形。
多边形
多边形是一些简单的形状,这些形状是由一些直线线条组成,我们可以用 moveToPoint: 和 addLineToPoint: 方法去构建。moveToPoint: 设置我们想要创建形状的起点。从这点开始,我们可以用方法 addLineToPoint: 去创建一个形状的线段。我们可以连续的创建 line,每一个 line 的起点都是先前的终点,终点就是指定的点。closePath 可以在最后一个点和第一个点之间画一条线段。
1 | - (void)drawRect:(CGRect)rect |
closePath 可以将路径封闭
不规则形状
要用弧线组成不规则的形状,我们需要用到中心点、弧度和半径。弧度以顺时针为准,0° 指向右边。
绘制一段弧度
1 | - (void)drawRect:(CGRect)rect |
贝塞尔曲线
贝塞尔曲线需要一个起始点,终点和控制点

1 | - (void)drawRect:(CGRect)rect |
贝塞尔曲线可以有多个控制点,可以实现类似波浪的效果:
1 | - (void)drawRect:(CGRect)rect |
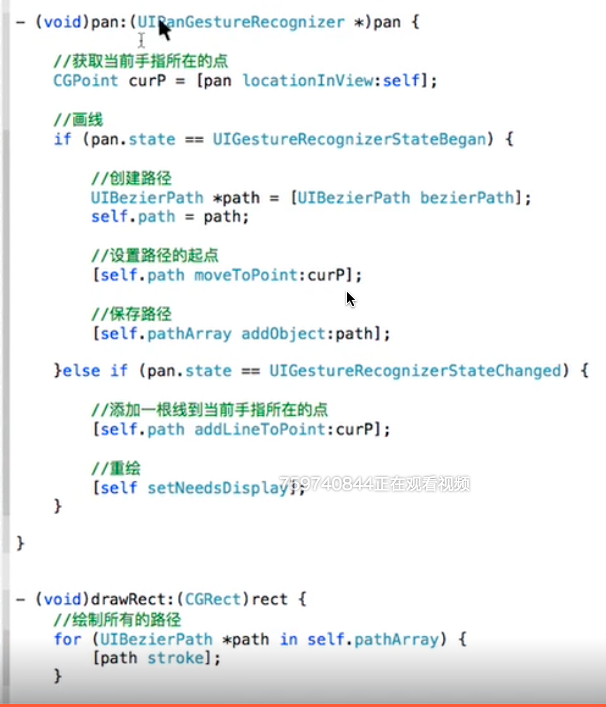
根据手势绘图
方法是根据手势移动生成相应的贝塞尔曲线,然后设置重绘。在 drawRect 中把这些曲线绘制出来:
stroke 方法的解释
上文中都是在 drawRect 方法中通过 UIBezierPath 绘制的。stroke 实质上帮我们省略了好几个步骤,包括:
- 获取当前上下文:
CGContextRef ctx = UIGraphicsGetCurrentContext() - 把贝塞尔曲线添加到上下文中:
CGContextAddPath(ctx, aPath.CGPath) - 绘制图形:
CGContextStrokePath(ctx)
也就是说在 drawRect 中都是需要开启上下文的。只不过通过 stroke 方式就省略了。
drawRect 的问题
drawRect 会生成一个图形上下文,这个空间为 图层宽*图层高*4 字节,会引起内存的暴增。所以,一般情况下,不要使用 drawRect 方法。
CAShapeLayer是一个通过矢量图形而不是bitmap来绘制的图层子类。用CGPath来定义想要绘制的图形,它的优点有:
1. 渲染快,有 GPU 硬件加速
2. 不会占用系统内存
3. 不会被图层边界裁减掉
4. 不会有像素化
推荐使用 CAShapeLayer,使用方式差不多,drawRect 是把 path add 到 context 上,CAShapeLayer 是把 path 赋给 layer.path
创建新的图形上下文绘图
上面 drawRect 使用的是当前图形上下文UIGraphicsGetCurrentContext() 绘制的。事实上,可以在任何时候,创建新的图形上下文新建 UIImage
在图片上写字生成新的图片
生成一个位图上下文,然后把图片和文字画上去,再获取位图:

裁剪图片(这个方法可以用来绘制圆角图片)
先设置裁剪的范围为一个贝塞尔曲线,然后把图片画到贝塞尔曲线中:

生成一张带边框的圆角图片
这在上面的基础上添加边框,也就是改变绘图的位置:
截图
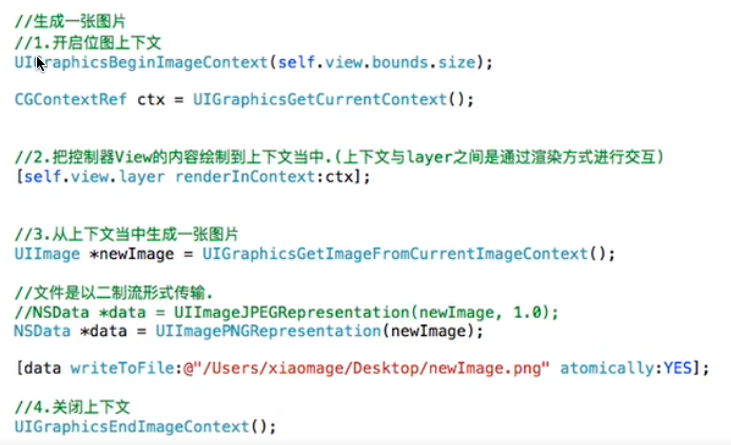
开启一个上下文,然后把视图通过 renderInContext: 绘制到上下文上。这种方式获取的是 UIImage 对象:
当然还有一种情况,直接通过系统 api 获取,该方法生成一个 UIView:
1 | - (UIView *)snapshotView { |
CAShapeLayer 的使用
只要把贝塞尔曲线的 CGPath 赋值给 CAShapeLayer 的 path 就可以了,不需要调用任何重绘方法。它的基本属性有:
- path:绘制路径
- fillColor:填充颜色
- fillRule:填充规则,就是如果图形里面也有线条,那么是否中间也要填充
- strokeColor:描边的颜色
- strokeStart:描边的开始点,默认为0最大为1
- strokeEnd:描边的结束点,默认为1 (配合核心动画可以实现那种慢慢变化的效果)
- lineWidth:线宽
- lineCap:线的端点的样式
- lineJoin:线交界处样式
使用 CAShapeLayer 设置圆角
将 CAShapeLayer 作为图片的 layer 的mask:1
2
3
4let roundedRectPath = UIBezierPath(roundedRect: avatorView.bounds, byRoundingCorners: .AllCorners, cornerRadii: CGSize(width: 10, height: 10))
let shapeLayer = CAShapeLayer()
shapeLayer.path = roundedRectPath.CGPath
avatorView.layer.mask = shapeLayer
这种通过 mask 的方式不会消除离屏渲染,只是这种方式比 cornerRadius 性能好一些。
进度条
不断的给 layer 赋不断边长的贝塞尔曲线
1 | - (void)viewDidLoad { |
图层的 bounds 的 x,y 不能瞎改,否则 path 会跟着 x,y 变化
View 消除阴影的离屏渲染
准确的说,这不属于 CAShapeLayer。
如果直接对一个 View 加一个 shadow,那么会产生离屏渲染。我们可以指定 shaowPath,避免离屏渲染:
1 | let imageViewLayer = avatorView.layer |