Storyboard是苹果官方主推的一个代替xib的策略。有必要详细学习下它的使用方法。
先来看一下思维导图
storyboard基础
storyboard优势
storyboard能代替nib自然有其优势,一般来说storyboard具有以下几种优点:
- storyboard能将nib汇总统一管理
- storyboard可以描述各种场景之间的过渡,这种过渡被称作
segue,storyboard 把 view controller叫做:scene,可以通过拖拽实现过度,减少代码 - 支持tableview的prototype cell,可以在storyboard中编辑cell,减少代码量
storyboard的基本使用
启动storyboard
加载storyboard肯定是需要一个主入口的,这个主入口在info.plist中: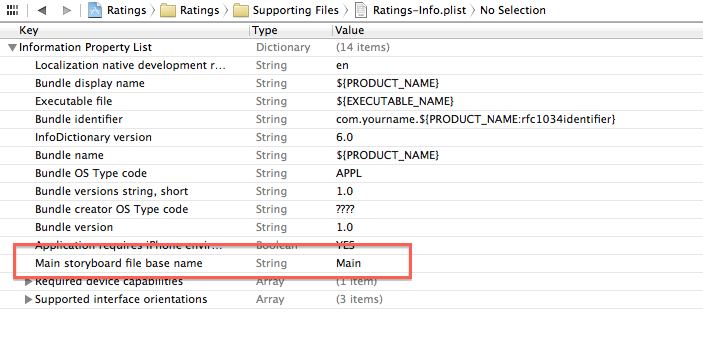
初始化ViewController
确定了哪个storyboard是主入口,那显然也要确定哪个ViewController是storyboard的主入口。需要选中相应ViewController,勾选Is Initial View Controller
此时,对应ViewController前出现一个箭头
创建relationship segue
对于三大container view controller,即Tab Bar Controller,Navigation Controller,Split View Controller ,可以通过拖拽创建设置relationship segue。
如下图的 popup menu 是从tab bar controller 连到navigation controller,松手后的弹出:
连接后的图标如下图,表示relationship segue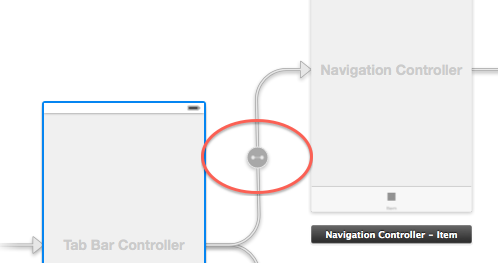
命名tabbar controller的tabbar
并非在tabbar controller里,而是在与其相连、对应的controller里改动,如图:
navigation bar 的 title 也是同理。但是,强烈不建议在storyboard里设置navigationbar,因为storyboard是为了简化操作的,但是设置navigationbar太麻烦了,还不如代码方便实用。
设置ViewController对应的类
选中相应ViewController,然后在 Custom Class 内写上相应类名即可。注意,要选中 ViewController 而不是其中的 View,要点击图中的黄色圆形按钮。
获取视图控制器
就是通过UITableViewController和UINavigationController中的viewControllers获取:
1 | UITabBarController *tabBarController = (UITabBarController *)self.window.rootViewController; |
Prototype cells
选中tableview,设置tableview的 cotent 为 Dynamic Propotype
一般在tableView: cellForRowAtIndexPath:方法中都像下面:
1 | - (UITableViewCell *)tableView:(UITableView *)tableView cellForRowAtIndexPath:(NSIndexPath *)indexPath{ |
但是,由于在storyboard中已经创建了cell,那么就可以直接使用了:
1 | - (UITableViewCell *)tableView:(UITableView *)tableView cellForRowAtIndexPath:(NSIndexPath *)indexPath |
当然,一个tableview里肯定不应该只有一个,可以把上面的 Content 下面的 Prototype Cells 增加cell,然后选择任意cell,如图: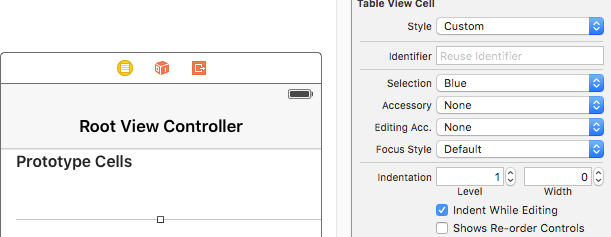
设置不同的 identifier 来标识不同的cell。
除了在viewcontroller里直接创建cell,不需要另一个cell的xib的区别外,其他方面和xib无异。也可以选中cell,在右边栏指定对应的Controller的custom class用来控制cell。同样的,也不能直接把cell中的view连线到cell所属的viewController中。
Static cells
使用静态的cell,适用在仅有几个确定cell的tableview中,不能重用,设置了几个cell,就显示几个cell。static cells的设置如下图: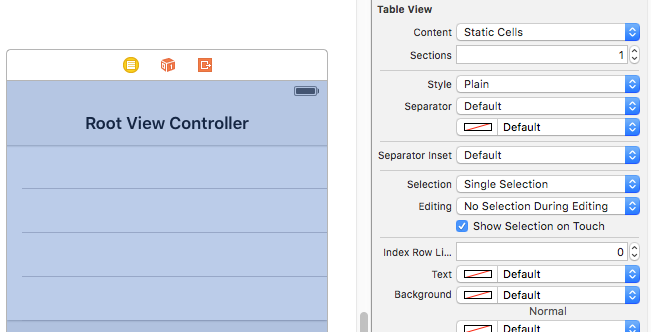
因为prototype cells究竟怎么显示可以在代码中设置,所以只需要设置有几个可重用的cell就行了,而static cells因为不可重用,那么这里的设置选项就变成了 Sections 设置多少段。
那么怎么设置每个section有多少个cell呢?选中如下图所示的只有static cells才有的蓝色立方体:
此时右边栏出现如图所示 Table View Section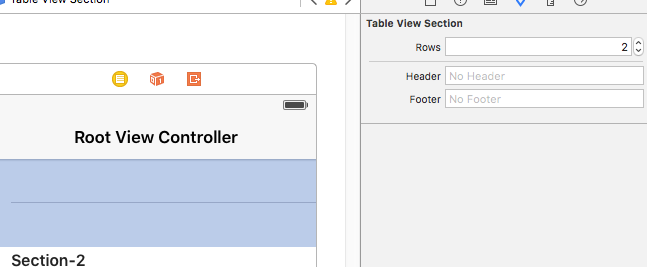
可以设置数量,表头表尾的title
和 prototype cell 一样,static cell可以指定一个专门的Controller。但是不同的是,static cell 的cell以及cell中的控件都相当于确定的view,因此,static cell可以把cell以及cell中的控件连线到cell所属的viewController中。
也就是说,如果在cell的Controller中设置了一个button的点击事件,然后又在cell所属viewController中又设置了一次该button的点击事件,不会报错,两个点击事件都会触发。
所以,方便起见,static cell 直接在viewController中连线设置就可以了。
使用segue
简介
什么是Segue
Storyboard上每一根用来界面跳转的线,都是一个UIStoryboardSegue对象(简称Segue)
Segue的属性
每一个Segue对象,都有3个属性
1 | // 唯一标识 |
Segue的类型
根据Segue的执行(跳转)时刻,Segue可以分为2大类型:
- 自动型(Action segue):点击某个控件后(比如按钮),自动执行Segue,自动完成界面跳转。
- 手动型(Manual segue):需要通过写代码手动执行Segue,才能完成界面跳转。
segue执行过程
手动调用performSegueWithIdentifier:sender:方法实现跳转。那么这期间发生了什么呢?大致分为三个部分。
- 根据
identifier去storyboard中找到对应的线,新建UIStoryboardSegue对象
1 | - (instancetype)initWithIdentifier:(NSString *)identifier source:(UIViewController *)source destination:(UIViewController *)destination; // Designated initializer |
其实就是执行了UIStoryboardSegue中initWithIdentifier:source:destination:方法,并且identifier就是在Storyboard中Segue属性设置的标识. 来源就是连线的头部. 目标就是连线尾
- 调用sourceViewController的下面方法,做一些跳转前的准备工作并且传入创建好的Segue对象
1 | - (void)prepareForSegue:(UIStoryboardSegue *)segue sender:(id)sender; |
所谓跳转前的准备,因为可以拿到Segue(来源控制器,目标控制器),所以就可以在这里给下一个控制器传递数据。这个方法是系统默认调用,所以只需要实现即可。另外,只能由来源控制器调用,来拿到目标控制器。
- 调用Segue对象的
perform方法开始执行界面跳转操作。
页面跳转
segue可以实现页面间跳转,除了上面的 relationship segue 还有 Action segue 和 Manual segue,分别对应button跳转和viewController跳转。
跳进
使用storyboard
Action segue 比较简单,就是将button连到要展示的viewController上,当点击时,就会触发。
Manual segue 相对比较麻烦,但是比较灵活。它设置了两个viewController的跳转关系,在你需要的时候出发跳转。
首先,先对两个viewController进行连线: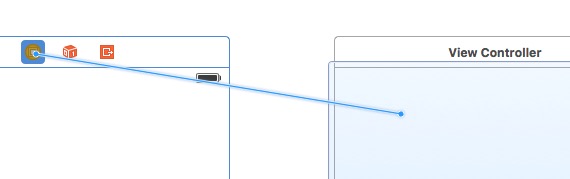
之后点击连线后两个viewController之间产生的箭头,在右边栏可以看到如下:
其中参数 identifier 就是跳转的标识符,根据这个标识符来确定跳转到是那个页面。下面几个参数,下面再说。
接下来就可以调用方法,在合适的时机加载了
1 | //根据 segue Identifier跳转界面 |
其中的identifer自然不用多说,那么sender是什么呢?sender是参数名称,理论上可以指代任何对象,用来区分是哪个控件触发了segue。比如有两个button都跳转到一个页面,那么这时就可以设置sender区分了。引申开来,在设置button点击事件时的-(IBAction)click:(id)sender;方法中的sender和这里的sender是一个作用。
使用纯代码
上面的方法实现效果和平时用的下面两个方法相同:
1 | //以modal 方式跳转 |
不过,既然用了storyboard了,那么实例化viewController时就不能用initWithNibName了。在storyboard中,要通过storyboard找到viewController的布局。首先要设置viewcontroller的 storyboardID: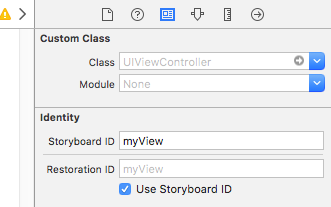
那个use storyboardId的勾不打也行,不知道干什么用的,
现在就可以在代码中找到特定storyboard的viewcontroller了:
1 | - (IBAction)tapButton:(id)sender { |
跳出
能跳进当然也要能跳出,可以使用 exit segue 跳转至任意连线的位置,也可以使用代码跳转。
exit segue
跳出和跳进的方法类似,略有区别,比如要从界面2跳转回界面1:
先打开需要返回到的界面ViewController1.m,加上下面方法,返回类型一定是IBAction,参数类型一定是UIStoryboardSegue,名称随便(这个方法一定要加,返回时调用的)
1 | //其他界面返回到此界面调用的方法 |
右键2界面上方的Exit(下图中画绿圈的)弹出菜单中可以看到刚才在1界面中加的那个方法的名称(下图中红色圈里),然后如下图一样连线,弹出菜单选择manual,这里连接自己表示要在当前viewcontroller中用代码的方式回退。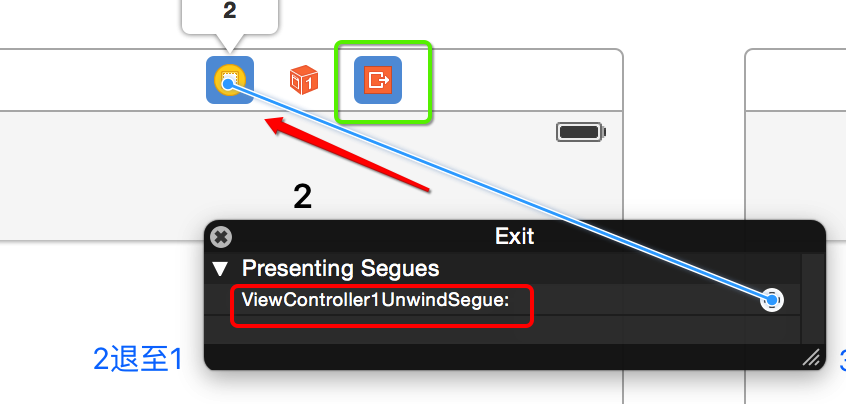
给2视图的unwind segue取一个名字叫from2to1的identifier如下图:
现在就可以在界面2中的任意时候调用方法回退了:
1 | - (IBAction)back:(id)sender { |
使用的仍是跳进时用的方法,不过第一步的操作已经告诉xcode这是一个回退操作了。可以从上图看到,这个 Unwind Segue 绑定了回退到的界面的一个方法,因此,执行跳转后会执行绑定的方法:
1 | //其他界面返回到此界面调用的方法 |
这里就看出上面为什么说类型一定是UIStoryboardSegue了,因为可以接收一个该类型的对象,以此判断是从哪个页面的回退。
使用 exit segue 的好处是可以跳转到任意打开过的界面比如从3->1,而不是只能返回上级界面从2->1。
一般跳出方法
也可以使用代码根据是model类型还是push类型选择:
1 | //弹出一个viewcontroller 相当与返回上一个界面 |
跳转的方式
在进行跳转连线后会出现如下窗口:
共有三种跳转方式,也就是上面右边栏的Kind属性
push
Push类型必须用在NavigationController中,否则报错。是在navigation View Controller中下一级时使用的那种从右侧划入的方式。
model
最常用的场景,新的场景完全盖住了旧的那个。用户无法再与上一个场景交互,除非他们先关闭这个场景。可以在右边栏的Presentation选择需要展示的动画效果。
custom
自定义类型,需要继承UIStoryboardSegue类,然后重写Perform方法,然后在Storyboard上将类设置为自定义的类。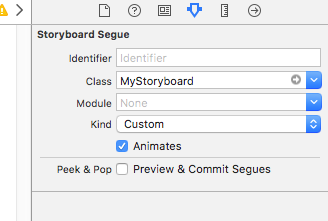
这段代码的作用是创建从中心渐变充满屏幕的动画:
1 | -(void)perform{ |
其实实质还是presentViewController,但是不用系统带的animation,而是先将destinationViewController的页面用动画加载后,直接present。
跳转传值
前面说到,- (void)prepareForSegue:(UIStoryboardSegue *)segue sender:(id)sender方法会在跳转时自动触发。跳转传值就在这个方法内完成。
我们可以对Segue的标识进行判断,一般有以下两种方法:
1 | - (void)prepareForSegue:(UIStoryboardSegue *)segue sender:(id)sender |
1 | - (void)prepareForSegue:(UIStoryboardSegue *)segue sender:(id)sender |
第一种需要在设置标识的值,并且匹配。第二种却是通过目标控制器判断。个人感觉还是第一种靠谱一些。
接下来就可以对destination进行赋值了:
1 | - (void)prepareForSegue:(UIStoryboardSegue *)segue sender:(id)sender |
跳转传值不仅可以用prepareForSegue:sender:实现,也可以通过代理、通知的方式,不过这样挺麻烦的,不推荐。具体参见使用storyboard实现页面跳转,简单的数据传递
storyboard reference
iOS9中,苹果引入了 storyboard reference 用以减小storyboard的体积,方便管理(并不知道iOS9之前怎么用多个storyboard)。
简化现有storyboard
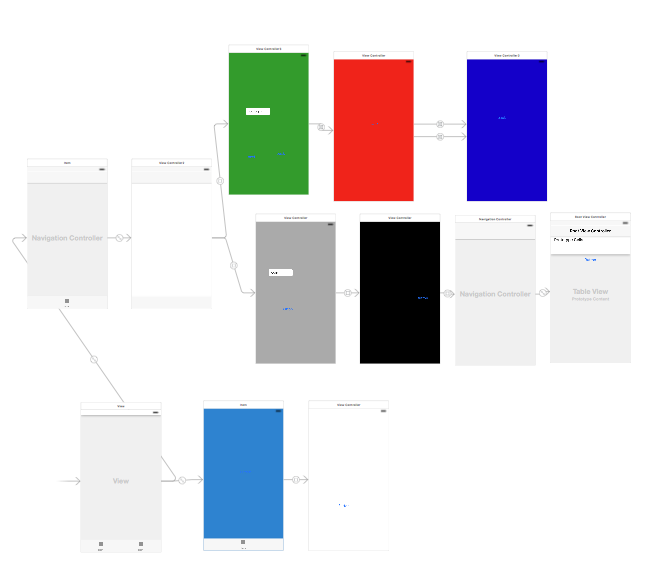
如下图,是做上面练习时创建的一个storyboard,界面已经有点多了。可以使用storyboard reference简化,将一部分viewcontroller拆分到其他storyboard里。
做法其实很简单,选中想要拆分的viewcontroller,然后在菜单栏干中“Editor->Refactor to Storyboard”,如下图所示。然后命名新的storyboard即可。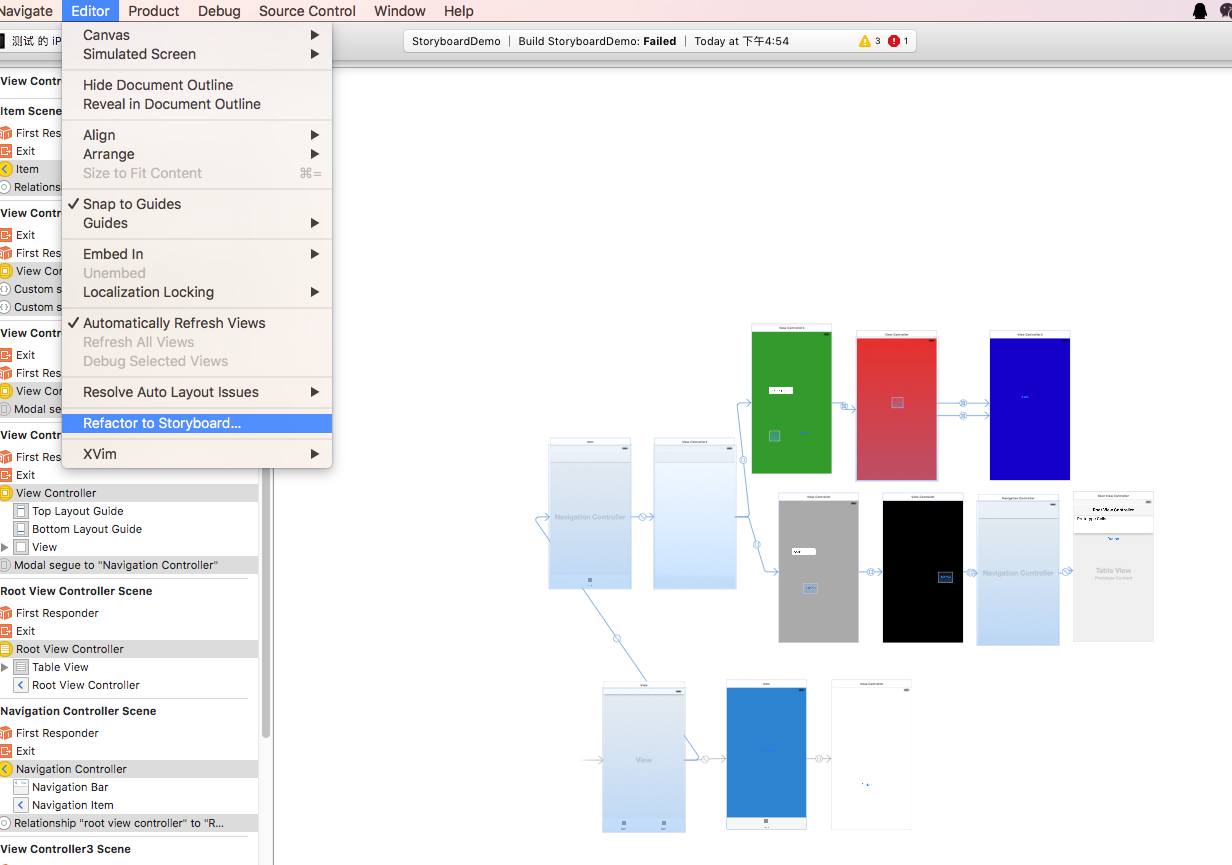

加载storyboard中一个特定viewController
和拖拽其他控件一样,找到storyboard控件,拖拽到storyboard上: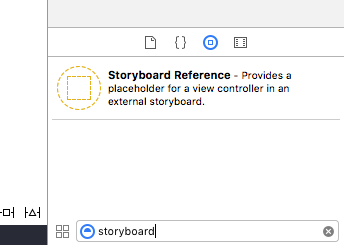
然后设置storyboard:
这里面storyboard填的是目标storboard的文件名;Reference ID是啥?从它的提示也就才出来了,用来确定联结的是那个viewController,填的是目标storyboard中目标viewController的Storyboard ID,具体在哪设,上面也说过。
这样,一个简洁的storyboard就能创建出来了。
参考链接
iOS-prepareForSegue场景切换,KVC传值;
(4.4.1)使用storyboard实现页面跳转,简单的数据传递;
【iOS界面处理】使用storyboard实现页面跳转,简单的数据传递
iOS9 Day-by-Day :: Day 3 :: Storyboard References;
基于Storyboard的创建多分支NavigationController的方法;
10 Practical Tips for iOS Developers Using Storyboards;
还有一些看完随手就关了,没有记录。
水平有限,如有错误,多多指正~